
A sequence-to-sequence (seq2seq) generation problem is to translate one sequence in one domain into another sequence in another domain. The classic example is the machine translation problem. For example, translating from English to Chinese
Happy Chinese New Year → 新春快乐Another example would be a chatbot that responds to input text:
Hello, my cold friend → Hello, Jian YanAs you can see, the input sequence does not need to match the output sequence in length. The most common seq2seq method is to use an Encoder-Decoder structure. The concept is relatively simple: the model first translates the input into a “thought vector” and then feed it into the decoder, which would decode it into a sequence of output.
Using the example above:
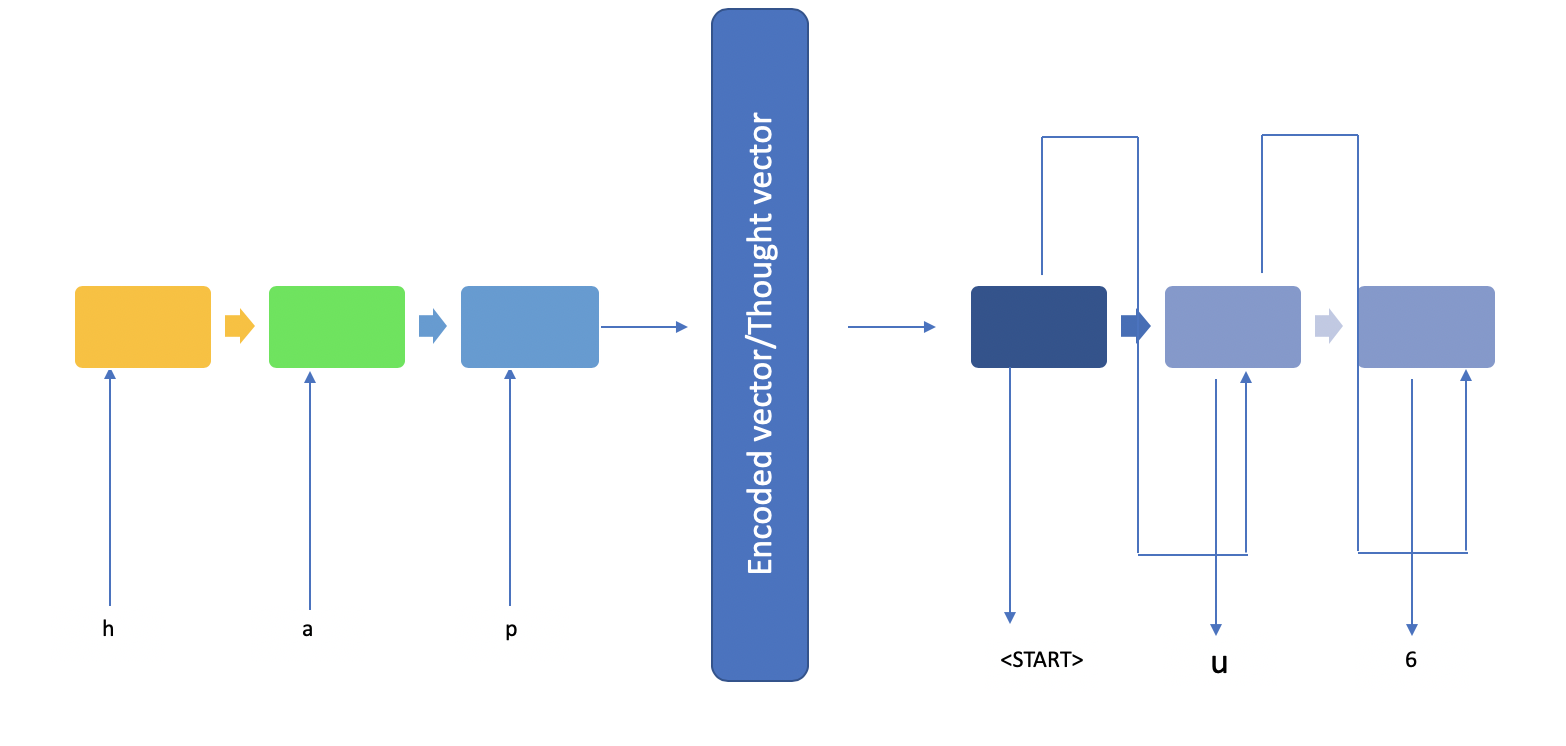
You may find the model described in very fine details in Keras’ documentation. It is actually quite complicated in that it required the encoder to return sequences as well as the hidden states, which is used to initialize the states for the decoder. Apartment from that, the example in the documentation is quite illustrative.
you may notice that I used character-level time series instead of word-level. In the example that I will give later, it is perfectly fine as the time series are quite short. In your application, you may find word-level input is better. However, this totally depends on your data. Another thing you may need to pay attention is the length of the time series of your output. Say if you are translating from Chinese (short) to English (much longer than Chinese), you may need to apply other technique such as attention etc.
The point of this blog, though, is not to talk about the encoder-decoder model for you will find an abundance of literature to better understand its design and limitation. Instead, we will focus on a multiple input encoder-decoder model.
First, let’s define the problem. I borrowed this problem from Jason Brownlee of https://machinelearningmastery.com and modified it. Say, you have several integers and we are looking for the sum of the integers. Sounds easy? But here is the twist, they are all in textual format. For example,
Input: '1','1','+','1','0','='
output:'2','1'
It’s easy for the machine to calculate 11+10=21 if they are integers; however, if they are chars and you don’t allow the algorithm to cast the strings into integers, they become a lot harder.
But, wait, didn’t you mention multi-inputs in the title?
So, let’s give it a twist. We need to let the computer know the base of the calculation. Say, we give it another input to denote the base (binary, octal, decimal, and hexadecimal). So the example turns into:
Input 1: '1','1','+','1','0','='
Input 2: 'b' #binary
output:'5'
Input 1: '1','1','+','1','0','='
Input 2: 'd' #decimal
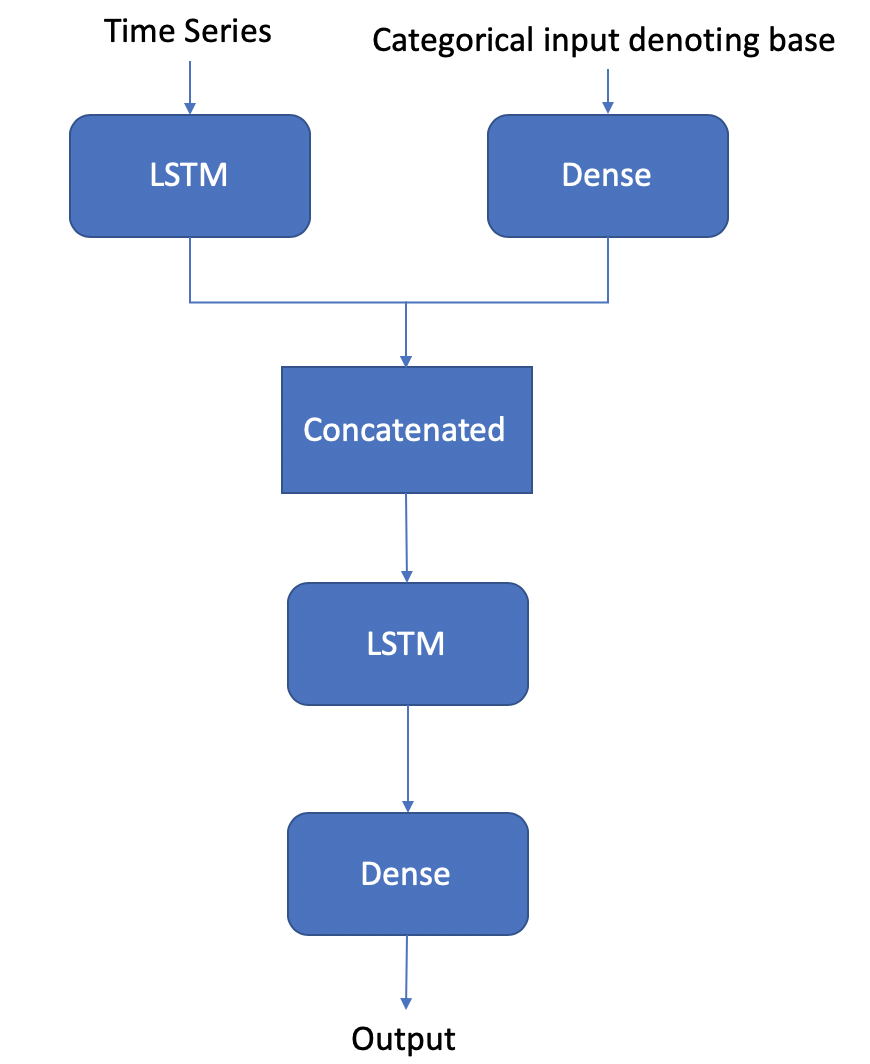
output:'2','1'Most Keras examples on the Internet are about using the Sequential() model. However, it won’t apply in this case. We have two set of inputs and they must both be fed into the neural network concurrently. Furthermore, they don’t have the same dimension. The text input is a 3 dimension input (num_samples x time_series_length x feature_per_step) while the base input is a two dimension (num_samples x categorical_encoding). You can think of this as the two dimensions of the input, similar to images’ channels. However, we cannot apply CNN in this case since 1) they are not the same dimension; 2) we need to have long-term memories to encode and decode sequences. Although, in theory, you can pad the base input to match the dimension and stack CNN on top of LSTM, I am not sure how well the model would perform.
Another thing perhaps you can also try is to append the base sequence to the back of a fixed-length encoding sequence of every character and feed the time series into the LSTM layer or an encoding layer then LSTM layer(s). I am not sure how well that’d perform either.
Back to the model
Keras has functional APIs that allows us to manipulate the layers and model structure in a very refined way and that’s exactly what we will use. So here is the game plan.
In the e-book by Jason Brownlee on LSTM . He proposed something entirely different from the structure in Keras’ documentation. He took advantage of the RepeatVector layer, which repeats the output n times instead of making the LSTM return hidden states and output sequences; additionally, he also took advantage of TimeDistributed wrapper, instead of initiating the output sequences with a start token. I tried both models and find they perform almost equally (while Jason’s LSTM model is slightly slower to train). The models given the same set of input requires different hyperparameters, which alludes to my second topic in this topic: Talos. It’s designed to help you automatically tune hyperparameters. I found Talos much easier to use than Hyperas, although it seems to offer more powerful tuning. Keras also has callback APIs to allow users to have early stops. But that may not be enough when you want to try different distributions and combinations of hyperparameters.
Both frameworks (Talos and Hyperas) work very similarly where you define a function and input data as well as the model function. They all try different combinations of hyperparameters to figure out the best performing como. For example, we are going to define the following hyperparameters:
p = {
 ‘lr’: [10**-3, 10**-2],
 “layer_1_text_input_neuron”:[64, 128, 256],
 “layer_1_base_input_neuron”:[64, 128, 256],
 “concatenated_layer_neuron”:[64, 128, 256],
 “epochs”:[3, 5],
 “batch”:[16, 32]
}
It has 2x3x3x3x2x2=216 combinations of hypermeters to try out. If you have powerful GPU(s), you can even try multiple combinations at the same time.
Without further due, let’s introduce the model function:
In the example I gave above, I didn’t bother using other optimizers while Talos allows you to try different optimizers, which you can define by using a list and an if statement inside the function. Talos didn’t support multi-input until very recently (end of Jan 2019). To scan the combinations of hyperparameters, simply call:
s = ta.Scan([input_text_training, input_base_training], output_training, model=produceModel, params=p, x_val=[input_text_val, input_base_val], y_val=output_val)One thing to note is that because we are using multi-input, we cannot use the default val_split parameters. We have to manually split the training/validation data and feed them into the scan function. Once the scanning starts, you will see something like the following to illustrate the progress:
68%|██████▊ | 147/216 [5:37:44<2:09:28, 112.59s/it]It basically tells me that per iteration is approximately 112.59 seconds on my computer and I have 216 iterations to go through. So that’d be around 6 hours.
Scan function returns an object that contains all the hyperparameter combo performance. You can view it by calling s.data. It is essentially a panda frame. So we can sort it easily:
s.data.sort_values('val_acc')And it will produce something like the following (note that it was from another training as this training wasn’t finished when I am writing this blog):

Predict
Input_text:['1', '0', '+', '1', '0', '0', '0', 'p', 'p']
Input_base: ['b'] # binary
print(reverse_output_encoding(model.predict({'text': feature_text(Input_text), 'bases': feature_base(Input_base)})[0]))
--> ['1', '0'] # in decimal
In the example above, you can see that I padded the input text to a fixed size and I chose the max length of the time series by calculating the max number in binary format. Hence, you see ‘p’.
I also used one-hot encoding with a length of 4 to denote the base. This is categorical data, so using integers is not recommended.
The data that gets fed into the model looks like:
Input_text:[[[0. 1. 0. 0. 0. 0. 0. 0. 0. 0. 0. 0. 0. 0. 0. 0. 0.]
  [1. 0. 0. 0. 0. 0. 0. 0. 0. 0. 0. 0. 0. 0. 0. 0. 0.]
  [0. 0. 0. 0. 0. 0. 0. 0. 0. 0. 0. 0. 0. 0. 0. 0. 1.]
  [0. 1. 0. 0. 0. 0. 0. 0. 0. 0. 0. 0. 0. 0. 0. 0. 0.]
  [1. 0. 0. 0. 0. 0. 0. 0. 0. 0. 0. 0. 0. 0. 0. 0. 0.]
  [1. 0. 0. 0. 0. 0. 0. 0. 0. 0. 0. 0. 0. 0. 0. 0. 0.]
  [1. 0. 0. 0. 0. 0. 0. 0. 0. 0. 0. 0. 0. 0. 0. 0. 0.]
  [0. 0. 0. 0. 0. 0. 0. 0. 0. 0. 0. 0. 0. 0. 0. 0. 0.]
  [0. 0. 0. 0. 0. 0. 0. 0. 0. 0. 0. 0. 0. 0. 0. 0. 0.]]]
Input_base: [[1. 0. 0. 0.]]
Those zero vectors are essentially paddings.
The output is a sequence as well. The raw output looks like:
[[1.97255233e-11 9.99999285e-01 5.54029825e-12 2.06219482e-12
  1.08495244e-12 1.43084431e-14 5.65859937e-15 2.12700585e-13
  1.14945395e-08 7.63291837e-07 1.03684173e-12 2.95346213e-12
  2.60342529e-12 3.36235488e-12 1.35840276e-12 2.16117423e-12
  1.04321142e-12]
 [9.99997377e-01 2.43702402e-06 1.61029661e-08 8.79704903e-12
  1.59366165e-09 5.24918477e-11 1.30939712e-11 1.14534338e-09
  2.54896037e-07 1.36095482e-08 2.27173228e-11 3.65118213e-11
  9.40156841e-11 7.32461661e-11 1.32176535e-11 4.36041793e-11
  1.39471837e-11]]
After using np.argmax, they are converted to indices, which then later converted to actual char by using a look up.
Hope you enjoy this blog, let me know if you have any questions.
Thank you and Happy Monday!